
I am sure that I have told you that I am 100% Italian so when I found this recipe, I absolutely fell in love with it. The first time I made it, I doubled it. It was quite a success. It is the perfect marriage of two of my favorites -- Chicken Parmesan and Eggplant Parmesan. What could be better? I can't think of a single thing at the moment. The smell in my kitchen last night was swoon worthy!
At most restaurants, if you ordered either Eggplant or Chicken Parmesan you would probably get a side dish of some type of spaghetti. I am definitely a spaghetti lover. I will eat almost any shape pasta. But last night, I tried something different. I found a recipe on the
http://www.cauliflower.com/ website for something called Cauliflower Mashed Potatoes. The recipe on the website was a little off so I changed it to make it easier to understand. I asked B how he liked them and he said they were delicious. He also told me that cauliflower is one of his favorite vegetables. I can't believe that I didn't already know this since we have been married for over 17 years. Even D liked the Cauliflower Mashed Potatoes. I didn't tell him that there was anything different in them but I would have if he had asked. I'm 99% sure your family will love these recipes.
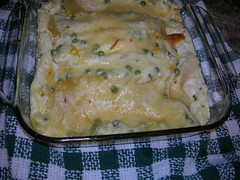
Chicken & Eggplant Parmesan
4 Servings
1 small eggplant ( about 1 pound), cut into 1/4 inch rounds
4 tablespoons olive oil
1 teaspoon salt
Fresh-ground black pepper
1 pound boneless, skinless chicken breasts (about 3)
2 cups canned crushed tomatoes in thick puree
1/2 pound fresh mozzarella, cut into thin slices
1/3 cup grated Parmesan cheese
1/4 cup lightly packed basil leaves
1. Heat the broiler. Arrange the eggplant in a single layer on a large baking sheet. Coat both sides of the eggplant with 2-1/2 tablespoons of the oil and sprinkle with 1/2 teaspoon of the salt and 1/4 teaspoon pepper. Broil, turning once, until browned, about 5 minutes per side. Turn off the broiler and heat the oven to 425 degrees Fahrenheit.
2. In a large nonstick frying pan, heat 1 tablespoon of the oil over moderately high heat. Season the chicken with 1/4 teaspoon of the salt and 1/8 teaspoon pepper and add to the pan. Partially cook the chicken for 2 minutes per side and remove from the pan. When cool enough to handle, cut the chicken crosswise into 1/4 inch slices.
3. Oil an 8-inch square baking dish. Put one third of the eggplant in a single layer in the dish. Top with half of the chicken, half of the tomatoes, half of the mozzarella, one third of the Parmesan, half of the basil, and the remaining 1/4 teaspoon of salt. Repeat with another third of the eggplant, the remaining chicken, tomatoes, and mozzarella, another third of the Parmesan, and the remaining basil. Top with the remaining eggplant and sprinkle with the remaining cheese. Drizzle with the remaining 1/2 tablespoon oil. Bake for 20 minutes and let sit for 5 minutes before cutting.
Cauliflower Mashed Potatoes
Ingredients
5 Pounds cauliflower florets, cleaned
5 Pounds Idaho russet potatoes, peeled
8 Ounces (2 sticks) butter
1/2 Cup heavy cream or milk
Salt and pepper to taste.
Method
1. Fill a large stockpot with water, add a pinch of salt and bring to a boil.
2. Add cauliflower and blanch 2 to 3 minutes until bright white in color.
3. Remove with a slotted spoon, let cool then chop the cauliflower and set aside.
4. Add potatoes to water, boil until fork tender about 25 minutes.
5. Drain water and add chopped cauliflower to potatoes.
6. Use a potato masher and mash the combination for 2 minutes.
7. Add butter and melt evenly. Add cream and season. Mixture will be lumpy.
The Creative Cook


