I love artichokes. They are so wonderful and healthy for you. Last Saturday, my mom and I went to the grand opening of a local supermarket. Everything was so clean and neat and beautifully displayed. All the fruits and veggies were lined up perfectly. I was completely bowled over by the beautiful artichoke display! They were probably Globe Artichokes but the supermarkets in my area don't say what type of artichokes they are. I'm just happy to see lovely artichokes in the markets at this time of year. I had always eaten artichokes at Thanksgiving. My mom is a pro at cooking them. I have made them a few times myself. The boys don't or won't eat them. I hadn't thought much about them since last Thanksgiving. I bought just two because I knew I would be the only one eating them. I hopped over to one of my favorite food blogs by Susan of Food Blogga. She gave a completely perfect explanation of how to clean, cook and eat artichokes back in April. Susan also has a recipe for stuffed artichokes and baby artichokes on her blog. She lives in Southern California where most of the artichokes we all eat are grown. She is very lucky!
I used her method to clean the artichokes. It wasn't as easy as it seemed that it would be. I probably don't have the best knives in the world but I found that cutting the outer leaves was fairly impossible for me. I just left them "as is". I will be careful when I am eating the "chokes" so I don't pinch myself. When I was a kid, my mom made the artichokes steamed in oil, water and with garlic cloves pushed in between the leaves. She didn't clean them out or trim them. I am pretty used to avoiding the pinchies. Artichokes were one of the few vegetables I would eat as a kid. I am not sure why but they are so good when they are cooked right. Don't try eating them raw or semi-cooked. They are terrible that way. I used Susan's method to cook them. I rubbed them with a lemon and squeezed some of the lemon juice all over them. Then I put them into a pot. They were so huge that they just about fit into my pot. I put about a cup of water on the bottom and drizzled them with olive oil. I also stuck a few garlic cloves into the leaves and into the center just for good measure. If you cook them for about 45 minutes on the stove top at medium your artichokes should come out perfectly. Remember that the leaves themselves aren't edible. Just pull off a leaf (it should come out easily if the "choke" is cooked properly) and scrape it against your upper teeth. The flavor is amazing. The "heart" of the artichoke is, of course, edible and delicious. I just put a little salt on it but you can eat them plain (as long as you have taken off the "fuzzy" stuff) or even use them to make a dip.
Please don't just pass by the fresh artichokes next time you're in a grocery store. Grab a few and plan to clean and steam them for dinner. You won't be disappointed!
The Creative Cook
Tuesday, June 3, 2008
Saturday, May 31, 2008
Pork Chops for the Slow Cooker
Slow cookers aren't just for meals made on cold winter days. They are useful in the summer months, too. So take out your slow cooker, dust it off, and make this yummy pork chop meal. It is quick to assemble and easy to clean up. D and B (my boys) really like pork chops. I am not a huge fan of them but I will cook them on occasion. The problem with most of the pork you can buy these days is that it is extremely lean. O.K. maybe that isn't too much of a problem. But the way I see it, the pork gets very dry, really quickly. In my opinion, the best way to make pork is either in the oven or in a slow cooker. As you probably know, slow cookers are much easier to use and clean than most ovens. Also, in the summer you don't necessarily want to heat up your whole house by using the oven (at least I don't). I did some searching on the internet for a tasty pork chop recipe. I found one but it had inconsistent reviews. Most folks said it was good but salty. Some said it was terrible. The ingredients for that recipe included both ketchup and soy sauce. This didn't sound very good to me so I changed up the recipe for my family. Please be sure to cook this recipe for only 6 hours on low setting. It isn't one of those recipes you can leave in the crock pot all day. Here is the recipe I came up with. I hope you will like it!
Pork Chops for the Slow Cooker
6 boneless pork chops
1/2 cup brown sugar or honey
1 teaspoon ground ginger
1/4 cup soy sauce (low sodium)
1/4 cup canned peaches mashed (and juice)
2 cloves garlic, crushed
Directions:
1. Place pork chops into the slow cooker. Combine the remaining ingredients and pour over the pork chops.
2. Cook on low setting for 6 hours, or until internal temperature of pork has reached 160 degrees F (70 degrees C).
The Creative Cook
Pork Chops for the Slow Cooker
6 boneless pork chops
1/2 cup brown sugar or honey
1 teaspoon ground ginger
1/4 cup soy sauce (low sodium)
1/4 cup canned peaches mashed (and juice)
2 cloves garlic, crushed
Directions:
1. Place pork chops into the slow cooker. Combine the remaining ingredients and pour over the pork chops.
2. Cook on low setting for 6 hours, or until internal temperature of pork has reached 160 degrees F (70 degrees C).
Serve with rice - we like jasmine rice - and a veggie. I like to serve it with green beans. Yum!
The Creative Cook
Friday, May 30, 2008
Flashback - 70's !!


Last week, D and I got into our "Wayback" Machine and time traveled back to the 70's. We made tie dye shirts. D liked his so much that he says I should quit my job and become a professional tie-dyer. I told him that there isn't much call for that job these days.

We did some "string art" which was what got us into this 70's mood. We saw a project in one of the Family Fun magazines for string art. I'm not very crafty so I went to Michael's Crafts and bought a string art kit. It was pretty easy. Here is a picture of D's creation. It isn't quite finished.

Believe it or not, I made some Blueberry Granola. The recipe came from the Slash Food website. Definitely check out the site and read the funny story behind this recipe. It is worth the read. I made a few changes to the recipe. It is tasty.
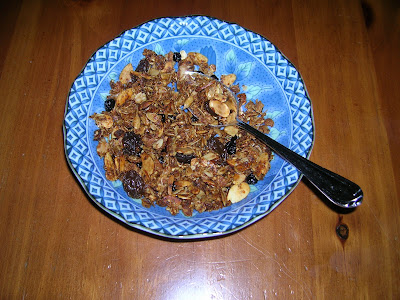
Blueberry Granola
2 cups rolled oats (not instant)
1 cup peanuts or toasted almonds
1/4 cup sesame seeds
1/2 cup toasted sunflower seeds
1/2 cup coconut (I used unsweetened, but you can go for the sweetened kind if you'd like)
1/4 cup toasted wheat germ (optional)
1/2 cup raisins
1/2 cup dried fruit (I used blueberries but you could use apricots or craisins or even dried apple)
scant 1/4 cup cooking oil (not olive)
1/2 cup honey
Mix the oat, nuts and grains in a large bowl. Measure oil into the measuring cup and swirl it around before pouring into bowl. Then measure out the honey in the same, unwashed cup. The oil will help the honey exit the cup. Toss everything together until evenly coated and then pour out into a baking pan. I use a large roasting pan, as it keeps everything contained. A cookie sheet with a lip also works, but you have to stir it slightly more carefully if you use that. Bake at 300 degrees for 20 minutes, turning it with a spatula every ten minutes or so. You want everything to be an even golden brown. When it is finished cooking, returned the baked granola to the mixing bowl, add the raisins and fruit and stir to combine. Stir gently several times as it cools, so that it doesn't clump together too much.
I never ate granola in the 70's, I never owned a tie-dyed shirt back then either. I did do my share of "string art" and made a few of those crazy yarn octopus (octopi?) (remember those). I wanted to share a little bit of the 70's with my son. We both enjoyed ourselves immensely.
Thursday, May 29, 2008
Memorial Day Tribute to My Dad - WWII Army Veteran
This post is a bit late but I wanted to share a video tribute that my niece M made for my 88 years young dad. It was taken at the WWII Memoral in Washington, DC. She did a really nice job. The video starts with pictures from when my dad was in the military then it shows some of his medals and awards received during WWII. Finally, it goes to the day that my Dad, his son-in-law S and his grandson-in-law, M along with baby Mason visited the WWII Memorial. The boys all drove down to DC together last fall. It is a touching video so keep some Kleenex nearby when you watch!
The Creative Cook
http://www.youtube.com/watch?v=IYIPEJUT9Uw
The Creative Cook
http://www.youtube.com/watch?v=IYIPEJUT9Uw
Friday, May 23, 2008
Cupcake Cake - 3 Dimensional Cake
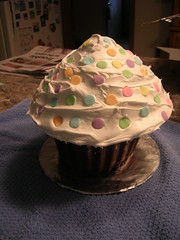
DSCN0852
I decided to bake a cake for last Saturday's Spring Fair. They have a cakewalk every year and I wanted to bake something different but not too difficult. I bought a Wilton 3D Dimensions Cupcake Cake Pan. It helped me to creat an unusual cake. I will say that it wasn't quite as easy as I thought it would be. Let me first say that I am not trained in any way as a cake decorator. I also think that the end result (see photo) looks a bit more like a mushroom than a cupcake. Oh well. It probably would look better if I had used a stiffer type of frosting. I liked the look with the large sprinkles on it. I think next time I would make sure that I had some chocolate frosting to cover the white frosting that got all over the bottom of the cupcake. I didn't check to see but I'm sure someone took this cake home from the cake walk. I hope they enjoyed it. The cake batter needs to be able to hold up to decorations so I used the recipe recommended by Wilton on their website. Most the other cakes looked store-bought. At least I tried to make something different. I did my best.
Double Chocolate Pound Cake
Tools:
• Dimensions® Large Cupcake Pan
• Cooling Grid
Ingredients:
• 2 teaspoons instant coffee
• 1/2 cup boiling water
• 1/2 cup unsweetened cocoa powder
• 3 cups all-purpose flour
• 1/2 teaspoon baking soda
• 1/2 teaspoon baking powder
• 1/4 teaspoon salt
• 1 1/2 cups (3 sticks) butter, softened
• 2 cups granulated sugar
• 1/2 cup firmly packed brown sugar
• 4 eggs
• 2 teaspoons vanilla extract
• 1 cup sour cream
• 1 cup mini semisweet chocolate chips
Preheat oven to 325°F. Grease and flour or use pan spray with flour to prepare pan. In small bowl, dissolve instant coffee in water; stir in cocoa powder and mix well. Set aside to cool.
Stir together flour, baking soda, baking powder and salt; set aside. In large bowl, beat butter, granulated sugar and brown sugar with electric mixer until light and fluffy. Beat in eggs, one at a time. Add vanilla; mix well. Combine cocoa mixture and sour cream. Add flour mixture alternately with sour cream mixture, beginning and ending with flour mixture, beating after each addition until smooth. Fold in chocolate chips. Spoon 4 1/2 cups batter into top of cupcake pan; spoon remaining batter into bottom of pan.
Bake 60-70 minutes or until toothpick inserted into center comes out clean. Cool cake in pan on wire rack 15 minutes. Turn cake onto wire rack to cool completely. To assemble cupcake ice top of cake's bottom half. Place top half of cake atop iced bottom half. Decorate as desired.
Serves 10-12.
Decorate as you wish but remember what I said about the frosting. I used a cake round that I bought at Walmart and I covered it with foil. I also liked a large box with foil to carry it to the Fair. It worked fine.
The Creative Cook
Saturday, May 17, 2008
Chocolate Chip Cookies
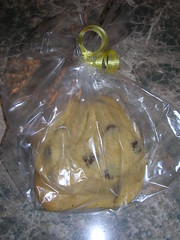
Chocolate Chip Cookies
Bake Sale Chocolate Chips
This year, as always, all the parents are asked to bake something for our kids’ elementary school’s Spring Fair. I usually bake the Oatmeal Chocolate Chips that I have already posted but this year I decided that I needed a new recipe. Our favorite realtor, Linda Betts, has us on the mailing list for her promotional magazine called American Lifestyle. This magazine usually has a few interesting recipes. The January issue had an entire article on Chocolate Chip cookies. I’ve always loved Chocolate Chips. Doesn’t everyone? The article explained how chocolate chips were born at the Toll House Restaurant in Massachusetts as a bit of a mistake when Mrs. Wakefield ran out of nuts for her butter cookies and used a chopped up Nestle Semi-Sweet chocolate bar instead. A happy mistake, I call it. The recipe I chose to make is called The Orchards’ Chocolate Chip Cookies. According to the article, these cookies originated at a bed and breakfast called The Orchards in Massachusetts. The Orchards offered their guests fresh-baked cookies and milk by their beds each night. The recipe came from a nationwide contest that the Inn had sponsored in 1987. It sounds like a winning recipe to me. I baked up a batch, packed them two to a bag and tied the bags up with festive ribbons. I hope they sell well at the Fair!
The Orchards’ Chocolate Chip Cookies
6 cups flour
1 tablespoon baking soda
1 tablespoon salt
3 cups butter (6 sticks)
2-1/2 cups brown sugar, firmly packed
1 cup granulated sugar
5 eggs
2 teaspoons vanilla extract
2-1/2 cups semisweet chocolate chips
1. Preheat the oven to 350 degrees F.
2. Combine the flour, baking soda, and salt, and set the mixture aside.
3. In a large bowl, cream the butter with a large wooden spoon. Add the brown sugar and granulated sugar and continue creaming until they are well blended. Beat in the eggs, one at a time, and the vanilla. Mix in the dry ingredients, using your hands to blend them well. Gently stir in the chocolate chips.
4. Drop by heaping tablespoonfuls onto parchment-lined cookie sheets. Bake for about 8 minutes. Do not overcook. Place the baking sheet on a rack so that air can circulate under the cookies as they cool or slide parchment paper, with the cookies still in place, onto racks to cool. When they’re completely cool, store them tightly covered.
Yield: 9 to 9-1/2 dozen
Enjoy!
The Creative Cook
Thursday, May 15, 2008
Arnold Palmer - Iced Tea Lemonade
I have been a big fan of Iced Tea and a big fan of Lemonade for a long time. I never thought about putting them together until recently. I heard that there is a drink mixing both of them that is named for the professional golfer, Arnold Palmer. It started way back in the 1960's when Arnold Palmer was in his heyday. It was his favorite drink and a smart waitress at a restaurant he frequented named the drink for him. The fact that I only learned about it a few months ago doesn't mean it isn't a popular drink. I am not a big fan of golf. The drink sounds good to me, though. It seems like a simple premise. Mix some lemonade with some iced tea in whatever proportions you prefer. I wanted to take it a bit further and make the iced tea and the lemonade from scratch. Apparently, there are lots of iced tea makers out there but I am from the old school, as I have probably mentioned a few times. I just went ahead and made my iced tea the old fashioned way by boiling water and putting a bunch of tea bags into a pitcher. Of course, you can go back even further and get yourself a tea infuser. I have never dealt with tea in its "unbagged" form but I imagine it would be messy. I guess if I am going to call myself old fashioned, I really should do it that way. Next time, maybe.
I also wanted to make fresh lemonade by squeezing a few lemons. It was very easy when I used my favorite Pampered Chef citrus juicer. I love Pampered Chef stuff. Pampered Chef is my secret splurge. I can rarely resist a Pampered Chef party even though I have so much of their stuff already. Oh well, I guess it could be worse. Don't tell all those Pampered Chef reps that I am a terrible push-over for their stuff. Right, they probably already know.
Why all this fuss about iced tea and lemonade. Well, I am trying to keep D from drinking too much soda. My sister started him on Sprite when he was about 2 years old. I really would have liked to keep him from it for a long time. But if she hadn't started him, I'm sure that my hubby B would have introduced him to it in due time, anyway. Fortunately, D likes iced tea and lemonade. He also likes things that are "different." That is what gave me the idea about making the Arnold Palmers. Personally, I don't like all the fruity iced teas that are available from Snapple and Arizona. I just prefer my tea with some lemon. The iced tea lemonade is about as "different" as I will go with my drinks. Call me boring but that is the way I like it.
Here are the recipes I found for Iced Tea and Lemonade. After making them both, I will use two pitchers to make the Arnold Palmers. At first, I am going to start with half tea and half lemonade. I will then adjust as needed. I prefer my iced tea unsweetened which is probably heresy to some people but again that is just the way I like it. Go ahead and add sweetener to the tea if you like.
Iced Tea
6 cups of boiling water
6 Lipton teabags
Steep tea for 2-5 minutes depending on how strong you like your tea. I steeped mine for 5 minutes because I knew it would be mixed with the lemonade.
Lemonade
2 cups boiling water
2 cups sugar
2 cups lemon juice (about 8-12 lemons)
ice cubes
I first boiled the water and then added the sugar. Stir to dissolve the sugar and make it into a simple sugar syrup. I poured this simple sugar syrup into a pitcher and then added the lemon juice and ice cubes.
Arnold Palmer
1/2 glass (4 ounces) iced tea
1/2 glass (4 ounces) lemonade
You can adjust the proportions of each to your taste. Enjoy!
The Creative Cook
Wednesday, May 14, 2008
Lemon Chicken Lasagna
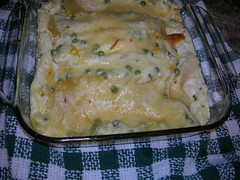
Lemon Chicken Lasagna
It is starting to get warm down here in Maryland. I am getting excited about summer. That's why I decided to make this Lemon Chicken Lasagna. I know that lasagna isn't exactly a summer dish but adding the lemon gives it a lighter taste. I got the recipe from the Better Homes & Gardens website www.bhg.com but I changed it quite a bit. The original recipe used a jar of garlic Alfredo sauce but I made my own. The original recipe also called for precooked frozen or refrigerated chicken breast strips. I went all out and actually cooked a chicken breast myself. The recipe says that it takes 20 minutes to prepare. I think I added about another 15 minutes to the prep time by making my own sauce and cooking a chicken breast. I decided to do the sauce myself after I picked up a few jars of the Alfredo sauce at the supermarket. They all seem to contain modified food starch which is really just another name for MSG. I am not a big fan of MSG. I also read the package of the precooked chicken breast that I always use. I was very surprised to find out that there is maltodextrin (aka MSG) in the chicken strips. I also left out the capers. I've tried capers and I don't like them. I never really knew what capers were until I did a bit of reading about them. They are really the buds of a flower Capparis Spinosa. The buds are pickled in brine or vinegar. I found out all this when I started googling for a substitute for capers. I found out that both pickles and green olives can be used as a substitute for them. Too bad I don't eat pickles or green olives either! Now, black olives I love but they won't work. Instead of even trying to find a substitute for the "flavor" of the capers, I just went ahead and used 1/4 cup of tiny peas. I wanted them for the color in the dish. You can go ahead and use capers, try pickles or green olives, whatever suits you.
Here is the recipe for the lasagna and the sauce:
Lemon Chicken Lasagna
Ingredients
16 oz Alfredo sauce (see recipe below) or use a jar of Alfredo sauce
1 Tbsp. drained capers (I used 1/4 cup petite green peas)
6 no-boil lasagna noodles
1/2 of a 15 oz container ricotta cheese
6 oz Fontina cheese or mozzarella cheese shredded (1-1/2 cups)
1-1/2 teaspoon finely shredded lemon peel
1/4 cup finely shredded Parmesan cheese
1 9 oz chicken breast or a pkg refrigerated or frozen cooked chicken breast strips (thawed, if frozen)
Directions
1. Preheat oven to 350 degrees F. Lightly coat a 2 quart square baking pan with cooking spray; set aside. In a saucepan combine Alfredo sauce and peas (or capers). Bring to boiling over medium heat, stirring continually. Spoon 1/3 cup of sauce mixture into prepared dish. Top with 2 lasagna noodles. In a bowl stir together ricotta, 1 cup of the fontina or mozzarella cheese, and 1 teaspoon of the lemon peel. Spoon half the cheese mixture over noodles. Sprinkle with 2 tablespoons Parmesan. Top with half of the chicken. Spoon half the remaining sauce over the chicken layer.
2. Top with 2 more noodles, remaining ricotta mixture, and remaining chicken. Add 2 more noodles, remaining sauce, and sprinkle with remaining Fontina or mozzarella and Parmesan.
3. Cover with foil. Bake for 40 minutes. Let stand, covered, on a wire rack for 20 minutes before serving. Sprinkle with remaining lemon peel. Makes 6 servings.
Alfredo Sauce
from www.cooks.com
1 cup cream cheese
2 cups 0-2% milk
6 tablespoons freshly grated Parmesan cheese
2 cloves of garlic
1/2 teaspoon black pepper
1/4 teaspoon salt
1 teaspoon dry parsley
The best way to make this sauce is to use a blender. Put the cream cheese, milk, Parmesan cheese, garlic and spices into the blender. Blend until there are no clumps, pour into sauce pan on medium heat, cook for about 10 minutes, while cooking add parsley.
Enjoy!
The Creative Cook
Sunday, May 11, 2008
Mother's Day Marble Cake

A few weeks ago, D and I were at a Borders Book Store at our local mall. He was buying one of his many "favorite" books. He is definitely like me in that he is a big reader and has to own all his books. The library just doesn't "do it" for him. He used to get really annoyed with me when he was younger and I took him to the library because he hated to have to return the books. As we were heading towards the checkout, I spied a book called The Seven Sins of Chocolate by Laurent Schott. It caught my eye right away because D is also a chocolate lover like me. I showed it to him and he said, "let's get it mom." Well, I have yet to make any recipes from that cookbook. It turns out that more than half of the recipes contain some type of liquor or other. The recipe for this Marble Cake contained Grand Marnier. D is definitely NOT a fan of alcohol in baked goods. I decided to try this recipe anyway and leave out the inappropriate ingredients. The results were amazing. It is such a simple cake. The only thing that could possibly have made the difference is that I heeded Laurent Schott's advice and took the eggs and butter out of the refrigerator a few hours before I baked the cake. The other thing that may have made a difference is that I used the recommended Dutch Processed cocoa. I nearly always ignore that type of recommendation and just use what I have in my pantry. Fortunately, I didn't ignore it this time. This cake is absolutely luscious. I made a first cake from the original recipe sans the Grand Marnier and orange peel. It was meant for a 6 cup bundt pan but I have a regular size 12 cup fluted bundt pan. Needless to say, the cake was tiny. But it was so good that I decided to double it and make the full sized cake to serve on Mother's Day, too.
Here is the recipe. Do try it. I didn't see the need for any type of frosting or glaze. It is good enough without any. I guess you could sift some confectioner's sugar over it, if you wanted.
MARBLE CAKE
Adapted from The Seven Sins of Chocolate by Laurent Schott
Remember to take all the ingredients out of the refrigerator a few hours before making this cake – that way the batter will be perfectly smooth
Serves 12-14
3 cups all-purpose flour
3 sticks unsalted butter, at room temperature
1-1/2 cups granulated sugar
6 eggs, at room temperature
2 teaspoons baking powder
6 tablespoons Dutch-processed cocoa powder
Preheat the oven to 350 degrees Fahrenheit.
Butter and flour a fluted-tube pan
Mix the flour, butter, sugar, eggs, and baking powder into a heavy-duty electric mixer on medium speed until very smooth, about 3 minutes.
Divide the batter in half, add the cocoa to one half, and mix well.
Drop alternate, irregular portions of the two cake mixtures into the pan to create a marbled effect. (I also used a butter knife to run through the batter to marble it.)
Bake for 45-50 minutes. Check that the cake is done by inserting a wooden toothpick into the center. When it comes out dry, remove the cake from the oven. Turn out onto wire rack to cool.
UPDATE: Comments from some of my guests were that this cake was "dry." That is a typical comment on cakes that have been made from scratch. People are used to eating box cake mixes. This definitely is NOT a box mix. I would suggest that you serve this cake warm from the oven or pop the pieces into the microwave for a few seconds. This will bring out the flavors and hopefully you won't get the "dry" comments.
The Creative Cook
The Creative Cook
Saturday, May 10, 2008
Happy Mother's Day!

SPONGE CAKE WITH MOCHA BUTTER CREAM FROSTING & ALMONDS
I am having the family over for Mother's Day. My sister and I decided weeks ago that everyone would come over to my house for pizza and cake. It may sound strange but it was an idea to keep me from having to cook on Mother's Day. I thought it would work out fine. We'll see.
Since I love to bake, I decided to make a replica of one of my family's favorite cakes from way back when we lived in Brooklyn. It was a Mocha Cake with Almonds. It came from a famous bakery called Ebinger's. The Ebinger's Bakery is long gone but our memories linger on. With my sister's help, I created this cake that I hope is somewhat close to the one we used to get from Ebinger's. My sister C told me that the layer cake part was a sponge cake. My brother A disagrees and says it is was a regular yellow cake. I guess we'll find out tomorrow when we cut into it. I know the frosting and the almonds are right. It can't be too bad, can it? The sponge cake itself was pretty easy. Most of the sponge cake recipes I read would make a very large sponge cake for a jelly roll pan. I finally found one that made two 9-inch layer cakes. This recipe differs from a traditional sponge cake because it does contain a small amount of butter. Most sponge cakes simply consist of eggs, milk, flour, baking powder, sugar and vanilla. The most important thing to remember when making this cake is to add the flour and baking powder into the egg mixture very quickly so you don't lose the texture. Apparently, if you don't add the flour quickly your cake will taste more like a kitchen sponge than a sponge cake! I tried my best to do it right. It sure looks pretty to me. I can't wait to taste it tomorrow!
Sponge Cake
from Cooks.com
4 eggs
2 cups sugar
1/2 teaspoon salt
2 teaspoons vanilla
1/4 cup butter
1 cup boiling milk
2 cups all purpose flour
2 teaspoons baking powder
Beat eggs until very light. Beat in sugar, salt, and vanilla. Beat in butter and boiling milk. Sift together flour and baking powder and beat in very quickly. Immediately pour into a prepared pans. I used parchment paper at the bottom of my pans because I read that no butter should be used on sponge cake pans. Makes two 9-inch layers or one 13 x 9 inch oblong. Bake at 350 degrees for 25-30 minutes or until cake tests done.
Mocha Butter Cream Frosting
from recipezaar.com
1 cup of unsalted butter at room temperature
1 tablespoon plus 1 teaspoon milk
6 ounces semisweet chocolate (I used chocolate chips)
1 teaspoon pure vanilla extract
1-1/4 cup confectioner's sugar, sifted
3 teaspoons instant espresso powder
Melt semisweet chocolate in a double boiler over simmering water or in a microwave in 30 second increments and set aside. The temperature of the melted chocolate should be lukewarm before adding it to the butter (around 10 minutes).
Cream butter on medium speed until smooth. Dissolve the espresso powder to the instant coffee in the 1 tablespoon and 1 teaspoon of milk. Add the melted chocolate and coffee-milk to the butter and mix well. Add sugar gradually and beat until creamy and smooth. Apply to cooled layer cake. After frosting the cake, add the sliced almonds to the sides of the cake.
UPDATE: My sister's comments were that the Ebinger's cake had 3 or 4 layers, not 2. She also said that the frosting was a little thicker than it should have been. I will try this again and cut the two 9 inch layer cakes in half and then figure out a way to make the frosting lighter - maybe add a bit less chocolate and a teaspoon less of the espresso coffee. It was tasty, though. Just not the same as Ebinger's. I appreciate her honest evaluation. Thanks!
The Creative Cook
Friday, May 9, 2008
Barbecued Chicken Pizza

Barbecued Chicken Pizza
D finally decided to take part in this blog. He picked a recipe from Rachel Ray's Cooking Rocks! 30-Minute Meals for Kids. He happens to be a pizza lover as most kids his age are. He was inspired to pull out this cookbook and dust it off after a visit from his friend J over the weekend. J's mom, Miss B, told us that he has the Rachel Ray Kids Cookbook and he has made several recipes from the book.
D is pretty brave about trying different foods. When we were out in Arizona visiting my niece M, we went out to eat and M and M (her husband) ordered rattlesnake. They said it was "in season" at the time. I guess it is a specialty in Arizona. I had no intention of eating rattlesnake or any other type of snake but D ate it. He said it tasted like chicken. In my opinion, it was gross just looking at it.
Oh, yeah I was telling you all about his pizza choice. He decided to make the Barbecued Chicken Pizza from Rachel Ray's kids cookbook. He liked the pizza except that the crust was too thick. I didn't have a store-bought pie crust in the house so I used the boxed Pampered Chef pizza dough mix. I have used this mix before and like it. The problem with it this time was that the packet is really supposed to be used to make 2 pizza crusts. I just got lazy and made one thick crust. I grew up in NYC and enjoy pizza with thick crust called Sicilian Style Pizza but D doesn't care for that. He grew up on the thin crust or hand tossed pizzas available in Maryland. We also didn't use scallions or red bell pepper because I didn't have any. I offered to let him use the green peppers that I had in the freezer but, after trying one, he decided to leave them out. D really did make this pizza himself. All I did was put it in the oven.
Barbecued Chicken Pizza!
Makes 4 servings
1 store-bought pizza crust, such as Boboli brand (12-inch)
1/2 cup barbecue sauce, any brand
2 cups chopped chicken, such as rotisserie chicken or left over roast chicken
2-1/2 shredded cheddar cheese (one 10-ounce bag, preshredded)
2 scallions, chopped
1/2 small red bell pepper, chopped
Preheat oven to 400 degrees Fahrenheit
Put the pizza crust on a pizza tray, large cookie sheet or baking stone. Cover with barbecue sauce, as you would pizza sauce. Top with chicken, cheese, and veggies and bake until golden and bubbly on top. 12 to 15 minutes. Cut into 8 pieces and serve.
The Creative Son
Thursday, May 8, 2008
Chicken & Eggplant Parmesan

I am sure that I have told you that I am 100% Italian so when I found this recipe, I absolutely fell in love with it. The first time I made it, I doubled it. It was quite a success. It is the perfect marriage of two of my favorites -- Chicken Parmesan and Eggplant Parmesan. What could be better? I can't think of a single thing at the moment. The smell in my kitchen last night was swoon worthy!
At most restaurants, if you ordered either Eggplant or Chicken Parmesan you would probably get a side dish of some type of spaghetti. I am definitely a spaghetti lover. I will eat almost any shape pasta. But last night, I tried something different. I found a recipe on the http://www.cauliflower.com/ website for something called Cauliflower Mashed Potatoes. The recipe on the website was a little off so I changed it to make it easier to understand. I asked B how he liked them and he said they were delicious. He also told me that cauliflower is one of his favorite vegetables. I can't believe that I didn't already know this since we have been married for over 17 years. Even D liked the Cauliflower Mashed Potatoes. I didn't tell him that there was anything different in them but I would have if he had asked. I'm 99% sure your family will love these recipes.
Chicken & Eggplant Parmesan
4 Servings
1 small eggplant ( about 1 pound), cut into 1/4 inch rounds
4 tablespoons olive oil
1 teaspoon salt
Fresh-ground black pepper
1 pound boneless, skinless chicken breasts (about 3)
2 cups canned crushed tomatoes in thick puree
1/2 pound fresh mozzarella, cut into thin slices
1/3 cup grated Parmesan cheese
1/4 cup lightly packed basil leaves
1. Heat the broiler. Arrange the eggplant in a single layer on a large baking sheet. Coat both sides of the eggplant with 2-1/2 tablespoons of the oil and sprinkle with 1/2 teaspoon of the salt and 1/4 teaspoon pepper. Broil, turning once, until browned, about 5 minutes per side. Turn off the broiler and heat the oven to 425 degrees Fahrenheit.
2. In a large nonstick frying pan, heat 1 tablespoon of the oil over moderately high heat. Season the chicken with 1/4 teaspoon of the salt and 1/8 teaspoon pepper and add to the pan. Partially cook the chicken for 2 minutes per side and remove from the pan. When cool enough to handle, cut the chicken crosswise into 1/4 inch slices.
3. Oil an 8-inch square baking dish. Put one third of the eggplant in a single layer in the dish. Top with half of the chicken, half of the tomatoes, half of the mozzarella, one third of the Parmesan, half of the basil, and the remaining 1/4 teaspoon of salt. Repeat with another third of the eggplant, the remaining chicken, tomatoes, and mozzarella, another third of the Parmesan, and the remaining basil. Top with the remaining eggplant and sprinkle with the remaining cheese. Drizzle with the remaining 1/2 tablespoon oil. Bake for 20 minutes and let sit for 5 minutes before cutting.
Cauliflower Mashed Potatoes
Ingredients
5 Pounds cauliflower florets, cleaned
5 Pounds Idaho russet potatoes, peeled
8 Ounces (2 sticks) butter
1/2 Cup heavy cream or milk
Salt and pepper to taste.
Method
Method
1. Fill a large stockpot with water, add a pinch of salt and bring to a boil.
2. Add cauliflower and blanch 2 to 3 minutes until bright white in color.
3. Remove with a slotted spoon, let cool then chop the cauliflower and set aside.
4. Add potatoes to water, boil until fork tender about 25 minutes.
5. Drain water and add chopped cauliflower to potatoes.
6. Use a potato masher and mash the combination for 2 minutes.
7. Add butter and melt evenly. Add cream and season. Mixture will be lumpy.
The Creative Cook
Tuesday, May 6, 2008
Cinco de Mayo
In keeping with the Cinco de Mayo, Mexican theme, I made Mexican Lasagna last night. Both my boys enjoyed it. I have to say that it was pretty good. There is no comparison to the Italian version of lasagna but has a nice taste. I made this recipe a few years ago for a friend who had just had twins. She made a point of letting me know how much her family enjoyed it. I suppose, if you just had twins you would enjoy any meal that someone made for you. Just thinkin.
This recipe comes from The Dinner Doctor Cookbook by Anne Byrn. She has a similar style to Sandra Lee from Semi-Homemade on the Food Network. Yes, she cuts corners but all the recipes I have tried from her cookbook have gone over well with my family and friends. So, as they say, "try it, you'll like it."
Anne says of this Mexican "Lasagna" recipe that she didn't come up with it herself, but that it "made the circuit". I guess she means that it has been passed around for a while. The only trick she mentions is that you need to use the correct size corn tortillas as your glass pie pan but if you have a 9 inch pan and 10 inch tortillas, just go ahead and cut them to size. No problemo.
Mexican "Lasagna"
To Prep & Cook: 15 Minutes
To Bake: 20-25 Minutes
Vegetable oil cooking spray for misting the skillet
1 pound ground beef round
1 jar (12 ounces) chunky salsa
6 corn tortillas (10 inches each)
1 can (16 ounces) refried beans, fat free if possible
1 cup reduced-fat sour cream
1 package (8 ounces; 2 cups) pre-shredded Mexican-style 4 cheese blend
Chopped fresh tomato and chopped scallions, for garnish (optional)
1. Preheat the oven to 400 degrees Fahrenheit.
2. Mist a large skillet with vegetable oil cooking spray, and place over medium-high heat. Crumble in the ground beef and cook, stirring and breaking up the lumps with a wooden spoon, until the beef browns all over and is cooked through, 4 to 5 minutes. Stir in 1/2 cup of the salsa. Set the beef mixture aside.
3. Spread the remaining salsa on the bottom of a 10-inch glass pie pan. Top it with 3 of the tortillas. Spread half of the beans over the tortillas. Spread half of the meat mixture, then 1/2 cup of the sour cream, then 1 cup of the cheese. Top with the remaining 3 tortillas and repeat the layers, ending with all but 1/4 cup of the remaining cheese. Cover the pie pan loosely with aluminum foil.
4. Bake the "lasagna" until it is hot throughout and the cheese has melted, 20 to 25 minutes. Remove the "lasagna" from the oven, let it rest for 5 minutes, then cut it into wedges or spoon servings onto plates, garnished with the remaining 1/4 cup cheese and the chopped tomato and scallions, if desired.
Sorry but I didn't take any pictures of this dish.
The Creative Cook
Sunday, May 4, 2008
Pastel de Tres Leches
Pastel de Tres Leches
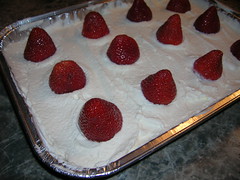
No, I am not Mexican but last week my husband asked me if I could make something (or help him make something) for the Cinco de Mayo celebration at his office. A lightbulb immediately went off in my head. I remembered that my niece M had sent me a delicious looking Cuban cake recipe that she had gotten from a friend of hers. M is half Italian and half Cuban. She enjoys the cuisine of both cultures. I did some reading about Pastel de Tres Leches and found out that it may have originally been made in Mexico. It is traditionally made for Cinco de Mayo celebrations. I'm glad M shared this recipe with me. If you want some more background information on Tres Leches Cake, click here.
Pastel de Tres Leches
Cake:
4 whole eggs
1 cup sugar
1 cup flour
1 tsp. baking powder
Milk Mixture:
1 can condensed milk
1 can evaporated milk
1 can half & half or whole milk (use the empty condensed milk)
1/2 teaspoon vanilla
1 Tbsp light rum (optional)
Whipped Cream Topping:
1-½ cups whipping cream
1 cup confectioner’s sugar
½ teaspoon vanilla
Strawberries (approximately 12)
Preheat the oven to 350°
Butter the sides and bottom of a 9 x 13 inch aluminum container.
Add the baking powder to the flour and mix it in a little with a spoon/fork.
Beat 4 whole eggs at medium speed. (For high altitude, use jumbo size eggs.)
Slowly add the 1 cup of sugar (as if you’re making merangue).
Once you’ve added all the sugar to the eggs, add the flour and baking powder and mix.
Add the batter to the prepared pan and bake. Set the timer for 25 minutes but watch it. It’s ready when the top gets light brown. Do the toothpick test. It’s a little like a soufflé so be careful setting it down, it might collapse in the middle. (If the cake deflates, don’t worry, it’ll all be covered up with the whipped cream topping.)
Once it’s cool, make little holes all over the cake with a toothpick or a knife.
In a blender, put the 3 milks, the vanilla and the rum. Blend well.
Pour the milk mixture over the cake slowly. Not all at once. Pour a little, let it soak in and then some more. Place cake in the refrigerator for 4 hours or overnight.
Whipped Cream Topping: When ready to serve, combine the whipping cream and the remaining 1/2 teaspoon of vanilla and 1 cup of confectioner’s sugar, whipping until thick. Spread over top of cake. Place the strawberries on top of the cake in rows.
Because of the milk in the cake, it is very important that you keep the cake refrigerated until serving.
Happy Cinco de Mayo!
The Creative Cook
Saturday, May 3, 2008
French Toast Waffles
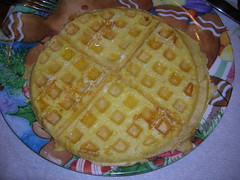
French Toast Waffle
This is a great quick way to cure breakfast boredom. Cook up some yummy french toast with your waffle maker. I wouldn't recommend using a Belgian Waffle maker because it would rip the bread. We used a regular round waffle maker and put one piece of bread on each of the four sections. We also removed the crusts of the bread. We were inspired to make this breakfast when we read about it on the Family Fun website and also on the Mr. Breakfast website. The recipes I read suggested using a bread called Texas Toast but I couldn't find it in our grocery stores. I was hoping to use challah bread but we didn't have any the day we made this recipe. Instead we used our favorite Arnold Brick Oven White Bread.
French Toast Waffles
RECIPE INGREDIENTS:
8 bread slices (whole wheat, seven-grain, or white), trimmed if preferred
2 tablespoons butter, melted
1 egg, lightly beaten
1/2 cup milk
1/8 teaspoon salt
1/8 teaspoon nutmeg
1/8 teaspoon cinnamon
1/2 teaspoon vanilla extract
First mix the cinnamon and nutmeg into the vanilla. Next, whisk together all the ingredients, except the bread. Dip each slice of bread into the mixture, we let it soak in a bit. We let the excess egg mixture drip off the bread so it didn't pool up in the waffle iron.
Spray the waffle iron with buttery Pam or oil. Preheat the iron until it is nice and hot (2 to 3 minutes). Place one slice of bread in each section of the waffle iron. We also cut off the edges of the bread that didn't fit into the iron.
Cook the French toast in the hot waffle iron until crisp (about 2 minutes). You don't need to cook these waffles quite as long as you would cook regular waffles.
This recipe makes two waffle. Each waffle is made with 4 slices of bread.
The Creative Cook
Friday, May 2, 2008
Chocolate Dipped Strawberries
Chocolate Dipped Strawberries
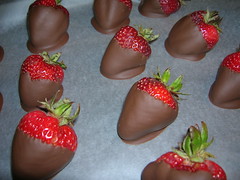
Yum! Chocolate Dipped Strawberries. Sinfully good. So worth the calories. These are definitely my top guilty pleasure!
I just realized that Mother's Day is just a week away. What better way to say "I Love You" to mom than with some yummy Chocolate Dipped Strawberries? I don't know. I would certainly love them if I got some from my hubby or D. Anyway, I beat them to the punch. As it turns out, the chocolate dipped strawberry has been around for quite a while. In the beginning, the chocolate was combined with paraffin to make it smooth and to help it adhere to the berry. Now, they are really simple to make for any occasion or even for no occasion at all. But I thought it would be nice to make some for a mom even if that mom is me!
From the reading I have done about dipping strawberries, I learned that the best chocolate to melt for this purpose is chocolate chips! I would not have thought that. There are so many varieties available at local grocery stores you might have a problem choosing.
There is also a best practice technique to use when dipping the berries. The first step would be to purchase some large fresh berries, wash them and make sure you dry them completely. I rinsed them then patted them dry with paper towels and set them on my counter to dry really well. Apparently, if you have even a hint of liquid on them or on your utensils it would cause your chocolate to "seize up" or turn the entire mixture into a grainy mess. You don't want that!!
Once you have the clean, dry berries ready, then you can start melting your chocolate. I have always thought it was best to use a double boiler but the microwave is a good option if you don't own a double boiler. In a microwave-safe bowl, melt chips using either the defrost setting or 10-percent power in the microwave. Use two to three minute increments until smooth.
Once your chocolate is melted and smooth you dip the strawberry into it, then give it a little shake as you withdraw it. This will fill in all the cracks and leave a nice, even line of chocolate at the base. When the strawberry is completely withdrawn from the chocolate, swirl it in a quick, clockwise motion to "spin" the dripping chocolate off.
Invert the hand, pointing the strawberry at the ceiling, to seal it and allow you to sprinkle other candies or toppings around the surface.
Cool covered strawberries on a sheet pan with wax paper. Keep them at a cool room temperature and try to dip them the same day you serve them.
You can always "double dip" them into different types of chocolate such as dark and milk or white and dark. The possibilities are endless. If you make these treats yourself at home, they are much less expensive than buying them at say Godiva Chocolate. I bought myself one very large yummy dipped strawberry at Godiva a year or two ago and it cost me about $8.00! Yikes!
Of course, you can also dip other types of fruit such as pineapple or orange slices or you could dip marshmallows or graham crackers but I am a purist. Only the berries for me!
The Creative Cook
Thursday, May 1, 2008
Italian Wedding Soup, I Vow it is Great!
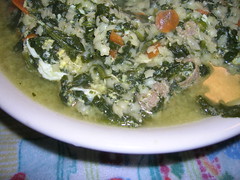
I have eaten Italian Wedding soup at restaurants and have always wanted to make it myself. I wondered why it was called "Wedding Soup." I have been to many Italian weddings but they didn't serve this soup at them. I did a little research and found out that the term "wedding soup" is a mistranslation of the Italian language name, minestra maritata, which refers to the fact that green vegetables and meats go well together in the soup. Some form of minestra maritata was long popular in Toledo, Spain before pasta became an affordable commodity to most Spaniards, though the modern wedding soup is quite a bit lighter than the old Spanish form, which contained quite a few more meats than just the meatballs of modern American versions. I also learned that even in Italy when this soup is prepared today, they don't use many of the traditional meats because they are difficult to find and very expensive. Some of the recipes I came across also use shredded chicken in the soup. I didn't see the need for it but I'm sure it would be good, too. You can substitute endive, escarole, cabbage, lettuce, or kale for the spinach.
I used frozen spinach in the soup as well as a carton of prepared chicken broth (Nature's Promise brand). My soup is excellent. I just ate a bowl to taste-test it for you. I would think that if you used fresh spinach and home-made chicken stock, the soup would be even better! Enjoy.
Wedding Soup
Serves 6 to 8
1 quart chicken broth
2 cups water
1/2 cup pastina (tiny pasta)
3 teaspoons fresh parsley, chopped (divided use)
1 carrot, thinly sliced
1/2 pound spinach, chopped (if using frozen, be sure to squeeze it dry)
1/2 pound lean ground beef
3 eggs (divided use)
2 teaspoons Italian-flavored bread crumbs (I used organic and added my own Italian flavorings)
3 teaspoons grated Romano or Parmesan cheese, freshly grated if possible (divided use)
1 small onion, finely minced
In a soup pot, combine the chicken broth, water, pastina, 1 teaspoon parsley, carrot and spinach. Bring to a low boil. Meanwhile, make the meatballs that will go into the broth. Gently mix together the ground beef, 1 egg, bread crumbs, 1 teaspoon grated cheese, the remaining 2 teaspoons parsley and the onion.
Form tiny meatballs; you should have about 30 or so. Drop the meatballs into the boiling broth mixture and simmer until they are cooked through, about 10 to 15 minutes.
In a small bowl, beat the remaining 2 eggs. With a wooden spoon, stir the soup as you pour in the eggs. Remove from heat. Cover and let stand for 2 minutes. Serve with the rest of the grated cheese, if desired.
The Creative Cook
Tuesday, April 29, 2008
DROPPS Laundry Detergent Liquid Pacs
O.K. you're right, this blog is supposed to be about food, eating and other food related issues. Well, this isn't quite a food related issue but I am trying to be a little bit "greener" wherever I possibly can. I found a really great laundry product that helps me be green. The product is called Dropps. They are premeasured laundry detergent (not sure if it really is a detergent) liquid pacs. They are great because they create much less garbage than those huge laundry detergent bottles that I used to buy. I also find that one small pac cleans any size load. Even though the package says to use two pacs for a large load, I just use one. The clothes come out great. I even got my mother hooked on these Dropps. I only wish they were available in more stores. The only place I have found them so far is at my local Walmart (believe it or not). My mom actually sent away for them from the company. She liked the idea of doing that because now she has 12 packs of 20 liquid pacs and it will last her "forever" she says. She ordered them yesterday and they were delivered to her door today! Since she ordered 12 packs she got -- free shipping!!
Another really great thing about Dropps for me is that they take up hardly any room in your laundry area and they are very light weight. I always hated going to BJ's and having to buy a huge bottle of laundry detergent. I had to make sure I had a visit to my chiropractor scheduled for the next day. No joke!
So, if you want to try something that is good for the environment and good for your back, please give Dropps a try. Their website is http://www.dropps.com/. They are sold in plastic pouches. I haven't seen them in any of our local grocery store chains but I am going to start asking for them. If you find them anywhere besides Walmart, please let me know.
The Creative Cook & Wannabe Green Mom
Wednesday, April 23, 2008
Buttermilk Brownie Cake

I promised you this recipe on Monday but I didn't get a chance to post it yesterday. Sorry! It went over very well at my house. Even D who is even picky about desserts, loved it. The recipe comes from Connie Mrachek who said it was her grandmother's recipe. I read about it in the American Profile magazine.
Buttermilk Brownie Cake
Cake:
2 cups granulated sugar
2 cups all-purpose flour
1/4 cup cocoa powder
1/2 cup vegetable oil
1/2 cup butter
1/2 cup reduced-fat buttermilk
1 teaspoon baking soda
2 eggs, lightly beaten
1 teaspoon vanilla extract
Frosting:
1/2 cup butter
1/4 cup cocoa powder
1/3 cup reduced-fat buttermilk
1 (1-pound) box confectioners' sugar
1 teaspoon vanilla extract
1. Preheat oven to 400 degrees Fahrenheit. Grease a 15-by-10-inch baking pan.
2. To prepare brownies, combine granulated sugar, flour and cocoa; mix well.
3. Combine 1 cup water with oil and butter in a medium saucepan. Bring to a boil; add to flour mixture and mix well. Add buttermilk, baking soda, eggs and vanilla. Beat well by hand and pour into pans. Bake 20 to 25 minutes, until a wooden pick inserted in the center comes out almost clean. Cool completely on a wire rack.
4. To prepare frosting, combine butter, cocoa and buttermilk in a saucepan; bring to a boil. Remove from heat. Gradually beat in confectioners' sugar and vanilla with a mixer at low speed. Spread evenly over cooled brownies. Serves 48.
Enjoy!
The Creative Cook
Monday, April 21, 2008
Blueberry Cream Cheese Coffee Cake
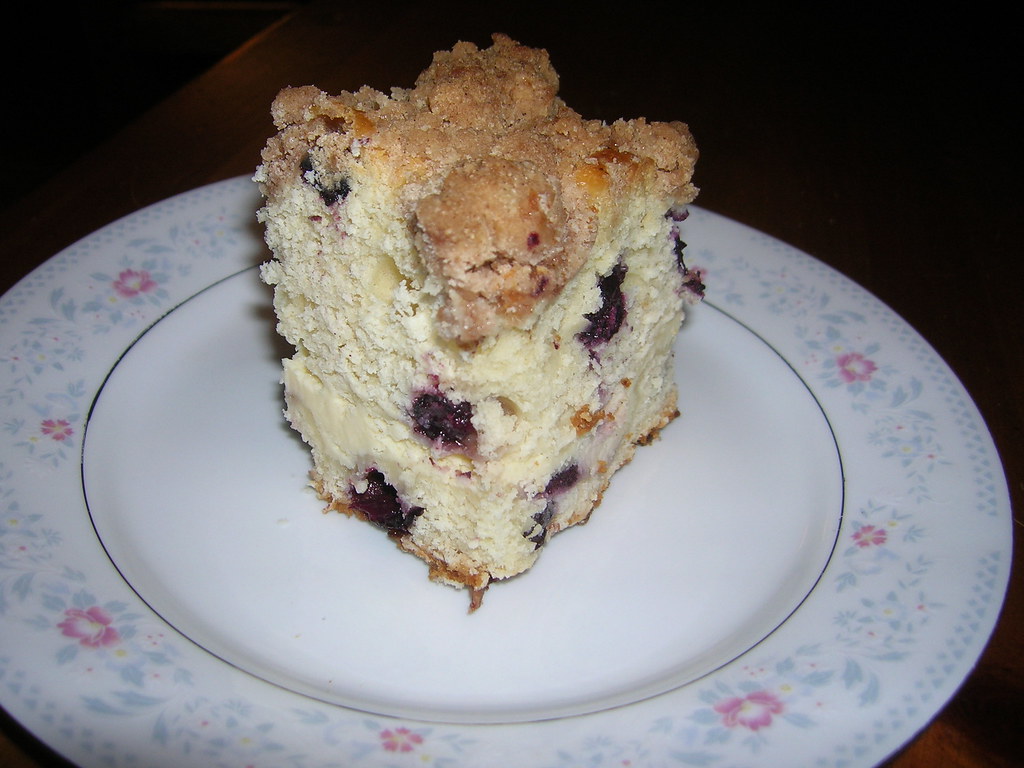 Yesterday was B and my 17th wedding anniversary. I can hardly believe we have been married that long. It really seems like only yesterday that we walked down the aisle together. B gave me (very unexpectedly) a beautiful bouquet of a dozen red roses last week. We don't usually do much to celebrate our anniversary but with D around he likes to celebrate. On Sunday morning, D made a special effort to bring me breakfast (not in bed but at the kitchen table) and he sat and ate with me. I mean he actually sat at the table and ate with me and didn't run off before I was done. It was a really nice treat. On Sunday afternoon, we had my parents, my sister and her husband and my nephew S and his wife over for cake. I had decided to bake Sara Moulton's Blueberry Cream Cheese Coffee Cake because my sister gave me a box of blueberries she had in her fridge for a while. She was going away to her high school reunion for the weekend and figured they would go bad if someone didn't use them. I rose to the challenge and did some baking. Fortunately, she was home in time to celebrate with us on Sunday afternoon. The cake came out great as usual. This is one of the recipes I have made several times. I saw Sara Moulton make it on the Food Network probably eight or nine years ago. I am not sure if she still has a show on Food Network. No matter. This recipe is wonderful. You will definitely enjoy it. She suggests using fresh blueberries rather than frozen. I used only 2 cups of blueberries rather than 3 because that was all I had. It really tastes better with the full 3 cups of blueberries in it. It was still very good, though. My nephew S can testify to that. He ate 2 pieces at my house and took some home. Thanks S! I also made Chocolate Buttermilk Cake which I will share with you tomorrow.
Blueberry Cream Cheese Coffee Cake
Filling
12 ounces Cream cheese; softened
1/3 cup Sugar
1 Egg
1 tablespoon Fresh lemon juice
1 teaspoon Vanilla
Streusel
1 stick unsalted butter; softened
1 cup Sugar
2/3 cup Flour
1-1/2 teaspoons cinnamon
1/4 teaspoon salt
Batter
1 stick unsalted butter; softened
1-1/4 cups sugar
2 Eggs
2 teaspoons vanilla
4 cups Flour
1 tablespoon baking powder; plus 1 teaspoon baking powder
1 teaspoon Salt
1 cup Milk
3 cups picked-over blueberries
Preheat oven to 375 degrees and butter a 13- by 9-inch glass baking dish. Do not use a metal baking dish.
Make filling: With an electric mixer, beat together cream cheese and sugar. Add egg, lemon juice, and vanilla and beat until smooth.
Make streusel: In a small bowl blend together streusel ingredients until crumbly.
Make batter: In another bowl with an electric mixer beat together butter and sugar. Beat in eggs, 1 at a time, and vanilla and beat on high speed until light and fluffy. In another bowl whisk together flour, baking powder, and salt and in batches slowly beat into butter mixture alternately with milk. Fold in blueberries gently but thoroughly.
To assemble cake: Spread 2 1/2 cups batter in bottom of baking dish and spread filling evenly on top. Drop spoonfuls of remaining batter on filling and spread evenly (be careful not to mix layers). Sprinkle streusel evenly over batter.
Bake coffeecake in middle of oven 1 hour and 5 minutes, or until golden and a tester comes out clean.
Cool coffeecake completely in baking dish on a rack.
By: Sara Moulton, Gourmet Magazine 1989
Saturday, April 19, 2008
Supper Swap Girls
It is a shame that very few people give dinner parties anymore. They seem to be passe these days. We're all too busy rushing our kids to sporting events, lessons, parties, etc. I have only one child but he is involved in several activities. D does karate, cub scouts, plays in his elementary school band and has religious ed. This keeps us all very busy. Dinner parties but a dream. When I read the article in my local newspaper about the Supper Swap Girls and their Fuss-Free Dinner Party Plan, I thought, "maybe this could work." They have a simple framework for a fun evening with friends.
THE PLAN
1. Invite three couples over for a four-course meal.
2. Each couple is in charge of one course with wine. The host makes the main dish. Go ahead and get out that wedding china you never use, because each couple also is in charge of washing the dishes from their course.
3. Divide up the menu and email the recipes. It's a surefire win.
Click here to check out their blog for all the details. They also stress that you can't worry about whether or not your kids are asleep or your house is clean. You should just go ahead and "do it." It does sound like a great plan. Now if only we knew 3 other couples with a free Friday or Saturday night. I have a feeling we would have to plan several months in advance. It would be worth it though to give me a chance to make one of the great recipes I've assembled for a bunch of friends.
The Creative Cook
Friday, April 18, 2008
Smith Island Ten-Layer Cake
As my fellow blogger, Cathy of My Little Kitchen reported a few weeks ago, the Smith Island Ten-Layer Cake was nominated to the Maryland General Assembly in a bill to be named as the official Maryland State Dessert. I just read in the Carroll County Times yesterday that the bill was successful! I am happy to provide you with a recipe for the newly appointed Maryland State dessert. As mentioned in the Carroll County Times, the cake's presentation seems to be more important than the recipe itself. Some of the recent write-ups on this dessert indicate that you could use a box cake mix in place of the recipe and then make the frosting and prepare it in its signature 10 layers. I would think that making the 10-layer cake from scratch would definitely take more time but that it would be a good investment because your cake would be an authentic Smith Island Ten-Layer Cake. No one seems to know when the first Smith Island 10-Layer Cake first came out of the oven but it has been around for at least 4 generations. Apparently, on Smith Island this cake is so common that it is just referred to as a "layer cake." Here is the recipe I found for the Smith Island Ten-Layer Cake.
Smith Island 10-Layer Cake
For the cake:
2 cups sugar
2 sticks unsalted butter, cut into chunks
5 eggs
3 cups flour
1/4 teaspoon salt
Heaping teaspoon baking powder
1 cup evaporated milk
2 teaspoons vanilla
1/2 cup water
Cream together sugar and butter. Add eggs one at a time and beat until smooth. Sift together flour, salt and baking powder. Mix into egg mixture one cup at a time.
With mixer running, slowly pour in the evaporated milk, then vanilla and water. Mix just until uniform.
Put 3 serving spoons full of batter in each of 10 lightly greased 9-inch pans, using the back of the spoon to spread evenly. Bake 3 layers at a time on the middle rack of the oven at 350 degrees for 8 minutes. A layer is done when you hold it near your ear and you don't hear it sizzle.
Start making the icing when the first layer goes into the oven.
Let the layers cool a couple of minutes in the pans. Put the cake together as the layers are finished. Run a spatula around the edge of the pan and ease the layer out of the pan. Don't worry if it tears; no one will notice when the cake is finished. Use two or three serving spoonfuls of icing between the layers. Cover the top and sides of the cake with the rest of the icing. Push icing that runs onto the plate back into the cake.
To Frost the Cake:
Take 1 slightly cooled layer and spread with cooled frosting. Add crushed candy randomly on layer. (Whatever your favorite is -- candy is optional as well.)
Add next layers, frosting, candy and repeat process until the 10th layer. Do not add candy to the final layer.
Finish frosting the cake and sides. You may have to wait to ice the top and sides until the icing cools.
Chocolate Icing for 10-Layer Cake
2 cups sugar
1 cup evaporated milk
5 ounces unsweetened chocolate
1 stick unsalted butter
1/2 to 1 teaspoon vanilla
Put sugar and evaporated milk in a medium pan. Cook and stir over medium heat until warm. Add chocolate and cook to melt. Add butter and melt. Cook over medium heat at a slow boil for 10 to 15 minutes. Stir occasionally. Add vanilla. Icing will be thin but thickens as it cools.
If you haven't seen a picture of this cake, you need to click on the link I put on the title of the recipe. It is one enormous cake. The State of Maryland may be small but we have one gigantic state dessert. What does that say about Maryland, I wonder?
If you ask me, this cake sounds like quite a bit of work. It seems to me that you would be eating mostly icing but for the chocoholic in me, that's o.k. If you want to see an authentic Smith Island lady named Mary Ada who bakes these cakes all the time, click here to watch a video of her that was on WJZ news last month. It is interesting that she can bake this cake and have everything cleaned up, washed and put away within 20 minutes! I find that amazing. I probably couldn't even have the batter ready for baking in 20 minutes.
The Creative Cook
Thursday, April 17, 2008
Grandma's Cookies Win $1 Million
That is the kind of story I like to hear!! Go grandma. Hey, if you think about it I could be a grandmother myself. But that isn't what this story is all about. I just read about a 59 year old Gaithersburg, Maryland grandmother who won the 53rd Annual Pillsbury Bake-Off this year. That is amazing. She is quoted as saying that her Double Delight Peanut Butter Cookies are crunchy on the outside and creamy on the inside. She said her grown sons aged 30 and 33 both told her she had a winning recipe. What clinched it for her was that their dog couldn't get enough of them. If D wasn't allergic to peanuts, I would bake a batch right now. I love peanut butter and so does my hubby. I really want some peanut butter cookies now. I have another great peanut butter cookie recipe that was given to my by my sister's niece Melissa. She tells me she came up with this recipe on her own. She adapted it from many different recipes over the years. She should have entered the Pillsbury Bake-Off with it. Wow~ a million bucks. We could all use that kind of cash. I had no idea that a recipe could be worth $1 million bucks. Anyway, thank you Melissa. Here is her recipe:
PEANUT BUTTER COOKIES
1/4 lb. butter
1 egg
1 cup creamy peanut butter (She only uses JIF)
1/2 teaspoon vanilla
1/2 teaspoon salt
1/2 cup granulated sugar
1/2 teaspoon baking soda
1/2 cup dark-brown sugar
1/2 cup flour
Preheat the oven to 350 degrees F and grease some cookie sheets. Cream butter and peanut butter together. Beat in the two sugars, then add the egg, the vanilla and mix well. Mix together the salt, baking soda, and flour and add to the first mixture, combining thoroughly. Arrange by teaspoonfuls on the cookie sheets, about 1 1/2 inches apart. Press each one flat with the back of a floured teaspoon. Bake about 7 minutes or until firm.
Hope you enjoy them!
Melissa
Note: You can also change them up a little taking each teaspoonful and rolling it in sugar then adding a Hershey's kiss right in the middle. I like using the cherry chocolate kisses but any kiss will do. :o]
Tuesday, April 15, 2008
Pesticides in Produce
I have been trying to go organic a little bit at a time. I know it is very expensive but I think it is worthwhile. I saw an interesting article in a newspaper or magazine a few weeks ago. It said that the things you should consider buying organic are certain types of produce that are commonly called the "Dirty Dozen." The dirty dozen are the following:
I am not always lucky enough to find organic versions of these produce items at my local grocery store when I shop. I do try to find organic potatoes, apples, pears and lettuce. I also often buy organic carrots and celery because they are readily available and sometimes almost the same price as non-organic ones. I am definitely going to try to buy organic berries this summer. I have also been trying to buy hormone and additive free milk and meats. I have not been lucky enough to find any really good organic cheeses in the markets near my home. At least ones that aren't super-expensive or just about to expire. It really annoys me that I can't get a gallon of organic non-fat milk. I have to buy two half gallons which is much more expensive. Every time I look at the gallons, they are only a few days away from their expiration date.
I am sorry to report that Horizon Organic used to have a farm in Annapolis, Maryland but they closed it after only a few years.
On a brighter note, the produce that you can buy non-organic (has the least amount of pesticides) are the following:
This does make some sense to me because most of the produce with lower pesticide levels have thicker skins. The ones that really don't make sense are the broccoli and the asparagus. Maybe they are less prone to pests than the others and don't get sprayed as much? I don't know. I am not going completely organic or anything but I am trying to buy healthier foods. Good luck!
The Creative Cook
Peaches
Apples
Sweet Bell Peppers
Celery
Nectarines
Strawberries
Cherries
Lettuce
Grapes (imported)
Pears
Spinach
Potatoes
I am sorry to report that Horizon Organic used to have a farm in Annapolis, Maryland but they closed it after only a few years.
On a brighter note, the produce that you can buy non-organic (has the least amount of pesticides) are the following:
Onions
Avocado
Sweet Corn (frozen)
Pineapples
Mango
Sweet Peas (frozen)
Asparagus
Kiwi
Bananas
Cabbage
Broccoli
Eggplant
The Creative Cook
Thursday, April 10, 2008
Chicken Caesar Salad Pizza

The weather is getting really nice down here. It was actually sunny today after several straight days of rain. In fact, my dad has been talking about Noah's Ark lately... Just in time for the great weather, I started craving salad. Not to mention the fact that my work calendar for April has a chef making a huge salad on it. Could that be the source of my cravings?? Maybe. But I asked D last night if he wanted to do movie and pizza night. He said "sure" in his creative kid fashion. I thought we should try something different so I suggested Chicken Caesar Salad Pizza. He jumped at the chance to try that. So tonight, I made the pizza and we lurved it. It was really great. We watched "Mr. Magorium's Wonder Emporium" and it wasn't nearly as bad as I was led to believe it would be. Maybe I was expecting a terrible movie. It wasn't "Charlie & the Chocolate Factory" or anything but it was far from terrible. I will say that Dustin Hoffman's character, Mr. Magorium is very weird. I wouldn't recommend it for really little kids but D thought it was pretty good. So rent a copy of it from the Red Box and cook up some Chicken Caesar Salad Pizza. You'll have a great night!
Chicken Caesar Salad Pizza
by Sandra Lee @ http://www.foodnetwork.com/
3/4 pound chicken tenders (we used pre-cooked chicken)
1/2 cup Caesar salad dressing, plus 2 tablespoons
1 (12-inch) pizza crust
1-3/4 cups shredded mozzarella and asiago cheese
1/4 cup shredded Parmesan
For Salad Topping:
4 cups hearts of romaine, shredded
1 tablespoon lemon juice
1/4 cup Caesar salad dressing
1/4 cup shredded Parmesan
1 cup seasoned croutons
Preheat oven to 450 degrees F. In a bowl combine chicken with 1/2 cup salad dressing; set aside. Brush pizza crust with remaining 2 tablespoons of dressing and top with cheeses; set aside.
Heat 2 tablespoons of oil in a large frying pan. When oil is hot, saute chicken strips for 4 to 6 minutes or until cooked through. Remove chicken from pan; place on top of pizza. Bake in preheated oven for 8 to 10 minutes, or until cheese is melted and begun to bubble. Complete pizza as directed.
The Creative Cook
Tuesday, April 8, 2008
The British Are Coming! The British Are Coming!
And I say, "Great." What I'm talking about is a brand new grocery store chain from England called Fresh & Easy that has landed in the U.S. Their first store just opened in Los Angeles recently. I read about it in an article by Bruce Horovitz for USA Today on AOL Money. It sounds like a great concept. They are offering quality food at low prices. This means fewer choices for shoppers. Why would I prefer a grocery store with fewer options, you ask? Well, that isn't the main reason I am cheering for them. I am glad to hear that these stores have wider aisles -- wide enough to fit 3 carts at once. On a recent visit to a very large local grocery store, I could barely get through each aisle. The store was super-crowded on a Monday night! Unfortunately, they keep the aisles packed with carts full of food that needs to be stocked and displays.
Fresh & Easy is also offering produce that is wrapped and date-stamped. Can you imagine that? I would love to be able to go into a grocery store and buy food that was within its use by or sell by date. I couldn't ever have come up with the idea of a use by or sell by date for produce. That is just amazing. I am forever buying produce that lasts a day or less in my house. No, I don't mean that we eat it that quickly. I mean it goes bad that fast. (I haven't tried those new green grocery storage bags yet.)
Another great idea -- no nasty cashiers -- Fresh & Easy has only self-checkouts.
So far, it seems as though the folks in LA are a bit confused as to what Fresh & Easy is because of its simple design and layout. I guess if a grocery store isn't "designer" the folks out there won't shop at it? I will definitely stop at a Fresh & Easy store if I ever see one in my travels. It looks fab to me. Maybe they should have opened their first store on the east coast, instead.
Here is the quote from the USA Today article that has me excited:
"Other Fresh & Easy features:
--Natural products. Fresh & Easy brand items have no added preservatives, artificial flavors, colors or trans fats. Eggs are from cage-free chickens; milk does not contain the growth hormone rbST.
--Low prices. An analysis by TNS Retail Forward found the total for a basket of eight Fresh & Easy products beat market chain Vons by 30%, Albertsons by 32% and Ralphs by 23%.
--Produce expiration dates. Fruits and veggies are mostly locally sourced - and come wrapped in plastic trays with expiration dates. The packaging, however, pleases some shoppers and seriously bugs others.
--Limited inventory. Fresh & Easy sells about 3,500 items vs. 60,000 at a typical supermarket.--Low shelves. You can see from one end of the store to the other.
--No loyalty cards. No swiping cards for the price breaks.
--Wide aisles. Aisles are wide enough for three carts to pass.
--All self-checkout. To cut costs, there are no cashiers.
--Limited advertising. The chains buy no TV or newspaper ads. When it enters a market, it mails $5 coupons to area residents.
--Green design. Stores are designed to use 30% less energy than typical grocery stores its size, and recycling is a priority.
--Show the food. Most Fresh & Easy brand products are packaged so shoppers can see what's inside.
--Wine guru. The chain employs an accredited Master of Wine (one of 265 in the world)."
When is Fresh & Easy coming to my neck of the woods, I ask?! Before I'm too old to care, I hope.
Sunday, April 6, 2008
Italian Style Rice Balls


Rice Balls are a wonderful comfort food for me. My mom always made them for us when we were kids. They are great on days like today. A bit chilly and kinda damp. At least it is in my little corner of Maryland. My pictures of rice balls are not very good. I must confess that I don't find them very photogenic. Just tasty. I hope you'll try them. I used 4 32 oz boxes of Nature's Promise chicken broth. You can use your own home-made chicken soup or whatever brand you choose. I am partial to Nature's Promise brand because it tastes great and it is readily available down here. I used Uncle Ben's Instant Brown Rice because my mother told me to. Really, she did. I am going against what I have told you in previous posts about not using boxed breadcrumbs. I used them for this recipe, again because my mother told me to! I did go with my gut and use an organic brand.
Italian Style Rice Balls
4 Quarts of Chicken Broth (I used Nature's Promise brand)
1 pound of lean ground beef (I use Laura's brand)
1/2 cup of Uncle Ben's Instant Brown Rice
1/4 cup unseasoned breadcrumbs (I used organic)
1 egg
1/4 cup of grated parmesan cheese
Get your chicken broth boiling in a large stock pot. Once it reaches a full boil then start mixing all the ingredients together well (I use my hands to do this). Form the meat mixture into small balls and drop them into the boiling chicken broth. Boil for approximately 45 minutes. You should start seeing the rice balls popping up to the top of the boiling stock. Once they start to rise to the top, they are pretty much done. I served myself a bowl immediately. You can garnish with more parmesan cheese and some parsley if you like. I didn't bother. These are great without any garnish.
The Creative Cook
Saturday, April 5, 2008
All-American, All Delicious Apple Pie!!


Guess what!? I made an apple pie today. I haven't made an apple pie from scratch or any other way (except by taking it out of the freezer and putting it in my oven) since about 1992. Back then, I decided to try my hand at making an apple pie. It came out pretty well but after I looked at the kitchen and contemplated how much work went into making that pie I decided that I could just go ahead and buy my pie from a bakery (Oh naive me, if only there was a bakery in this neck of the woods that sold a decent apple pie). I haven't eaten much apple pie since 1992 because most of the pies we have available here are from grocery stores (yuck). We did have a bakery in a small town not far from here. My mom bought an apple pie or two from that bakery. Unfortunately, the apples in the pie were practically raw. I don't know about you, but I really don't like to take a bite of apple pie and hear a "crunch." So, I just did without apple pie.
Last night, I was lying in bed thinking about what to make for this blog. I couldn't say I was inspired by anything. Then suddenly, I remembered I had a bag of organic apples in my fridge. Yeah, I could use up those apples in something. This morning I asked my son whether he would like apple turnovers or apple pie. He chose the pie. That is how I came to decide on making an apple pie. Yes, apple pie. I know it's spring not fall but apple pie goes great with spring and summer meals. I think apple pie is the perfect dessert for any season.
The pie that I made is from the cookbook "Baking from My House to Yours by Dorie Greenspan." I just bought this cookbook and have been reading through it. The recipes look to die for! I have been thinking about joining TWD (Tuesdays With Dorie) but I haven't done it yet. I hope that I haven't ruined my chances of becoming part of that group by pre-making one of her recipes! Oh well, we'll see. In case you don't know anything about Dorie Greenspan (which I didn't until I started reading TWD), she is the author of the best-selling cookbook "Baking With Julia" -- Julia Child that is. Dorie has also written books with Pierre Herme. Dorie is awesome!
So far, the apple pie looks great. It is baking in the oven right now. It wasn't nearly as difficult as I thought it might be to make this pie. I think that Dorie's idea about using the food processor to make the pie dough really cuts the time down. I have to admit that I already made one mistake with the pie that I know of. Instead of putting the graham crackers on the bottom of the pie dish, I mixed them in with the apples. I also put two tablespoons on top of the bottom pie crust. You'll understand what I'm talking about after you read the recipe. By the way, Dorie also has a website called In the Kitchen and on the Road with Dorie Greenspan. I am not going to type out Dorie's recipe for the Good for Almost Everything Pie Dough. If you want that, you can find it here.
I just took the pie out of the oven and it is taking all my strenth not to cut right into it. It smells heavenly in here. And, if I do say so myself, the pie looks perfectly yummy. I can't wait to have a slice with a cup of coffee or a glass of milk tomorrow.
All-American, All Delicious Apple Pie
Good for Almost Everything Pie Dough for a double crust (page 442) chilled
4 pounds (about 6 very large apples)
3/4 cup sugar
Grated zest of 1 lemon (I used lemon juice)
2 tablespoons of quick-cooking tapioca
1/2 teaspoon ground cinnamon
1/8-1/4 teaspoon freshly grated nutmeg (I used 1/4 tsp)
1/4 teaspoon salt
2 tablespoons graham cracker crumbs (or dry breadcrumbs)
2 tablespoons cold unsalted butter, cut into bits
FOR THE GLAZE (Optional):
Milk or heavy cream
Decorating (course) or granulated sugar
Getting Ready: Butter a 9-inch deep-dish pie plate (Dorie uses a Pyrex plate). If you want to use a standard 9-inch pie plate, just reduce the amount of filling by about one quarter. (I used a regular 9-inch pie plate and cut down the amount of apples to 3 pounds).
Working on a well floured surface (or between wax paper or plastic wrap), roll out one piece of the dough to a thickness of about 1/8 inch. Fit the dough into a buttered pie plate and trim the edges to about a 1/2 inch overhang. Roll the other piece of dough into a 1/8 inch thick circle and slip it onto a baking sheet lined with parchment or a silicone mat. Cover both the circle and the crust in the pie plate with platic wrap and refrigerate for about 20 minutes, while you preheat the oven and prepare the filling. (If it's more convenient, the crusts can be well covered and kept refrigerated overnight).
Getting Ready to Bake: Center a rack in the oven and preheat the oven to 425 degrees F.
Peel, core and slice the apples. You've got a choice for slicing: you can cut each apple in half and then slice each half crosswise or lengthwise into slices about 1/4 inch thick, or you can cut the apples into chunks about 1/4 to 1/2 inch on a side. In either case, put the apples into a large bowl and add the sugar, lemon zest, tapioca, cinnamon, nutmeg and salt. Toss everything together really well -- I do this with my hands. If you've got a little time, let the mix sit for about 5 minutes, until the juice starts to accumulate in the bottom of the bowl.
Remove the pie plate and top crust from the refrigerator and put the pie plate on a baking sheet lined with parchment or a silicone mat. Sprinkle the crumbs evenly over the bottom of the crust --this will help keep it from getting too soggy (some sog is inevitable)--and then turn the apples and their juices into the crust. The apples will heap over the top of the crust. Pat them into an even mound. Dot the apples with bits of cold butter.
Very lightly moisten the rim of the bottom crust with water, then center the top crust over the apples. (If the crusts -- top and bottom -- are still very cold and in danger of cracking when you work with them, let them sit at room temperature for about 5 minutes.) Either fold the overhang from the top crust under the bottom crust and crimp the crust attractively, or press the top crust against the bottom crust and trim the overhang from both crusts even with the rim of the pie plate. If you've pressed and trimmed the crust, use the tines of a fork to press the two crusts together securely. (I used the latter method)
Use a sharp knife to cut about 6 slits in the top crust. I always use the wide end of a piping tip to cut a circle out of the center of the crust as a steam vent. If you'd like, brush the top of the crust with a little milk or cream and sprinkle it with sugar. (I did both of these)
Bake the pie for 15 minutes. Lower the oven temperature to 375 degrees F, and bake the pie for another 50 to 60 minutes (total baking time is between 65 and 75 minutes), or until the crust is gorgeously browned and the juices bubble up through the top crust. After about 40 minutes in the oven, if the top crust looks as if it's browning too quickly, cover the pie loosely with a foil tent.
Transfer the pie to a rack and let it rest until it is only just warm or until it reaches room temperature. Then enjoy!!
The Creative Cook
Friday, April 4, 2008
Happy Friday!
I haven't been doing much cooking or baking this week. It is almost the end of tax season so I have been working every day this week and I'll be working every day next week. So today, instead of providing you with an awesome recipe, I have some interesting pictures created with food. Can you guess what vegetables or fruits were used to create these pictures? I can see potatoes, onions, tomatoes, and gourds. What intrigues me is how do you find the time to spend creating pictures like this? I have to think they were created for some type of advertising purpose, otherwise I really can't imagine why anyone would do it. But in any event, the pictures are really interesting. Check them out.


Subscribe to:
Posts (Atom)